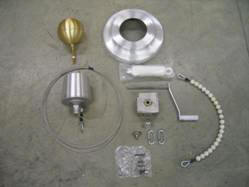
 Parts
List:
Parts
List:Assembly Instructions – Internal Winch
Parts
List:
Ball Ornament with lock washer
Revolving Truck assembly with stainless steel cable
Winch Assembly with 2 bolts and lock washers
Winch Handle
Lock Assembly
Lock Key
Counterweight with 2 quick links
Ball Sling
Base Collar
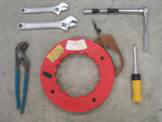 Required Tools:
Fish Tape
Adjustable Wrench
Ratchet with Extension
Phillips Screwdriver
Electrical Tape
STEP 1:
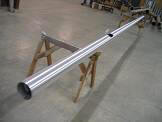 Remove
flag pole from shipping tube and completely unwrap it from the paper covering.
To aid in assembly, place the flag pole on saw horses with the access door
facing up.
Remove
flag pole from shipping tube and completely unwrap it from the paper covering.
To aid in assembly, place the flag pole on saw horses with the access door
facing up.
STEP 2:
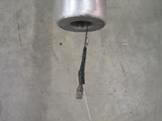 Feed
fish tape through the access door to the top of the flag pole. Attach the cable
coming from the bottom of the truck assembly (the end with the cable stop)
securely to the fish tape using electrical tape and slowly pull the cable down
the flag pole and out through the access door.
Feed
fish tape through the access door to the top of the flag pole. Attach the cable
coming from the bottom of the truck assembly (the end with the cable stop)
securely to the fish tape using electrical tape and slowly pull the cable down
the flag pole and out through the access door.
STEP 3:
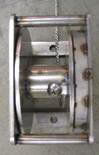 With the winch outside of the flag pole, position
the winch so that it is orientated in the direction that it will be installed
into the access opening (see picture step 4) with the widest side of the winch
to the right, facing the small hole in the flag pole. Feed the end of the cable
that is exiting the access door through top of winch, between mounting bracket
and stud. Route the cable behind and then under the barrel to form a “J” if
viewed from the right. Remove screw and place cable stop in slot and replace
screw securely.
With the winch outside of the flag pole, position
the winch so that it is orientated in the direction that it will be installed
into the access opening (see picture step 4) with the widest side of the winch
to the right, facing the small hole in the flag pole. Feed the end of the cable
that is exiting the access door through top of winch, between mounting bracket
and stud. Route the cable behind and then under the barrel to form a “J” if
viewed from the right. Remove screw and place cable stop in slot and replace
screw securely.
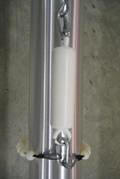
STEP 4:
 Using the 2 included bolts and lock washers, mount winch
assembly into the flag pole making sure that it is properly orientated as shown
to the left. Tighten using a ratchet and extension.
Using the 2 included bolts and lock washers, mount winch
assembly into the flag pole making sure that it is properly orientated as shown
to the left. Tighten using a ratchet and extension.
STEP 5:
 Thread
truck into to flag pole and tighten using a large adjustable wrench, we
recommend the use of LOCTITE on the treads to prevent the unit from backing out
of the flag pole.
Thread
truck into to flag pole and tighten using a large adjustable wrench, we
recommend the use of LOCTITE on the treads to prevent the unit from backing out
of the flag pole.
Using supplied lock washer and nut, thread ball into truck assembly and tighten nut.
STEP 6:
 Insert
handle into winch and crank clockwise until the snaps are at the base of
the truck assembly.
Insert
handle into winch and crank clockwise until the snaps are at the base of
the truck assembly.
It is VERY IMPORTANT that some resistance is put on the cable while cranking to insure that the cable spools properly. Failure to due so may result in flag slippage or cause the cable “spring” off the barrel and jamb the function of the winch.
STEP 7:
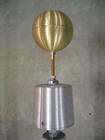
 Using
supplied quick links, attach the counterweight to the end of the cable and then
wrap the ball sling around flag pole shaft and attach to the bottom of the
counterweight.
Using
supplied quick links, attach the counterweight to the end of the cable and then
wrap the ball sling around flag pole shaft and attach to the bottom of the
counterweight.
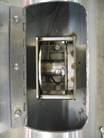
Attaching Access Door Cylinder Lock

Step 1: Insert cylinder into door hole with the marks (dots) pointing to the right side of the door and secure using large lock washer and nut.
Step 2: Thread one small nut and then a lock washer onto stud, slide cam onto stud (as shown above). Now add another small lock washer and then the nut and secure into place.
Check the operation of the lock to make sure that the lock operates smoothly and the door is securely held in place. Adjustments may be made by loosening the cam retaining nuts and repositioning the cam.
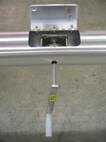
Prior to erecting flag pole, slide base collar up to just below the access door. Secure in place using rope or rubber sling. This will hold collar out of the way while leveling the flag pole.
©2007 Admiral Flag Poles, Inc.